This is the single, end-to-end guide to InboxKit. It walks you through the complete journey, from funding your account to sending from fully warmed mailboxes inside your sequencer, in the order you will actually do it.
If you want the fastest possible path, jump to Topic 2, Quick Setup, which bundles domains, mailboxes, sequencer and DNS into one guided flow. Everything after that explains each piece in depth so you know what is happening and how to change it later.
Contents
Topic 1: Add Credits
Video Tutorials: Credits & Billing
Nothing can be purchased until your account is funded, so this is always the first step.
How InboxKit billing works
InboxKit runs on a single, flat, prepaid model. Your wallet holds credits, where 1 credit = 1 USD, and everything is charged from that balance. There are no plans, no tiers and no mailbox slots to manage.
Google Workspace and Microsoft 365 mailboxes: $3.00 per mailbox per month
Azure mailboxes: $30 per domain per tenant, covering every mailbox on that Azure domain rather than each one individually
Domains: billed separately at the registration price shown at checkout, which varies by TLD
Pre-warmed domain and mailbox bundles: see Topic 7
Add-ons: InfraGuard, Inbox Placement Tests and Email Validation, covered in Topic 9
Your billing cycle (Monthly, Quarterly or Yearly) is chosen once. Contact support if you need to change it later.
How to add one-time credits
You can reach the credits screen from two places: Settings > Billing, or the credits chip in the top-right corner of the dashboard, which opens a menu containing Add Credits.
Open Add Credits.
Stay on the One-time tab.
Pick a preset amount, which is 100, 250, 500, 1,000, 2,500 or 5,000 credits, or type a custom amount in the field below the presets.
Check the Total, then click Pay.
Complete the Stripe payment by entering your card details and billing address.
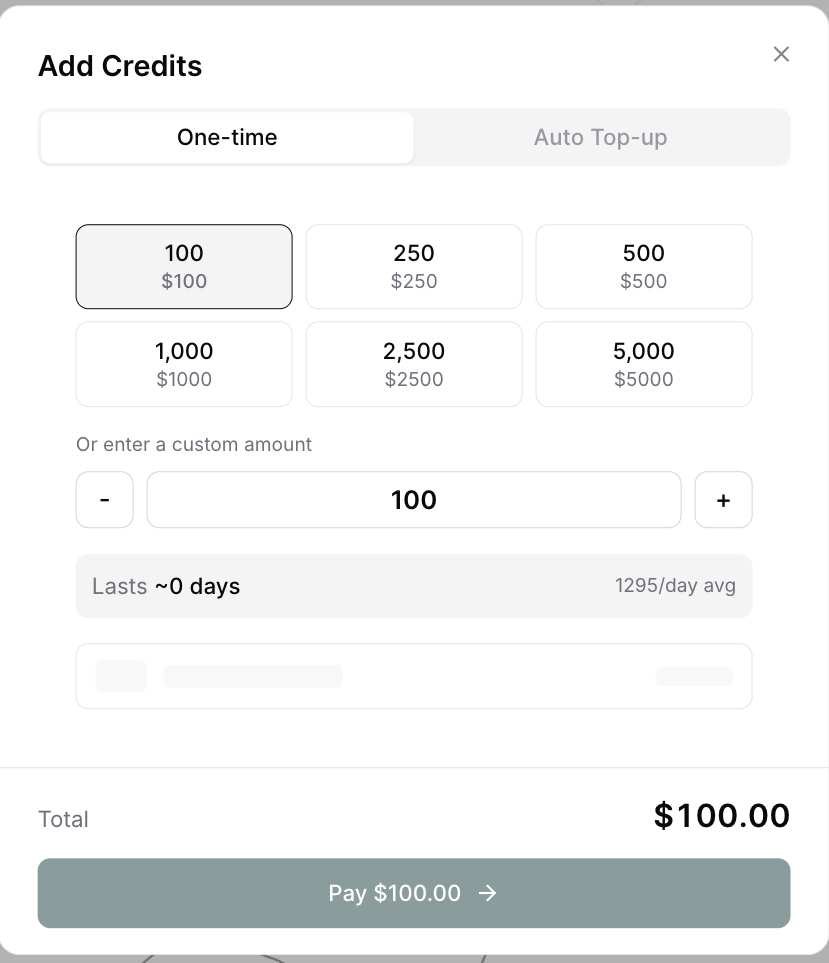
The minimum top-up is 10 credits. Any custom amount below that will not be accepted, so enter 10 or more.
Paying with American Express? Amex is not supported through the standard Stripe checkout. Please contact support and the team will generate a customer payment link for you, which accepts Amex.
Credits land in your wallet immediately. Your first purchase requires full card and address details. After that your card is saved and payment takes one click.
How to enable Auto Top-Up (recommended)
Auto Top-Up prevents mailboxes from failing at renewal because the wallet ran dry. Open Add Credits, switch to the Auto Top-up tab, and choose between two modes.
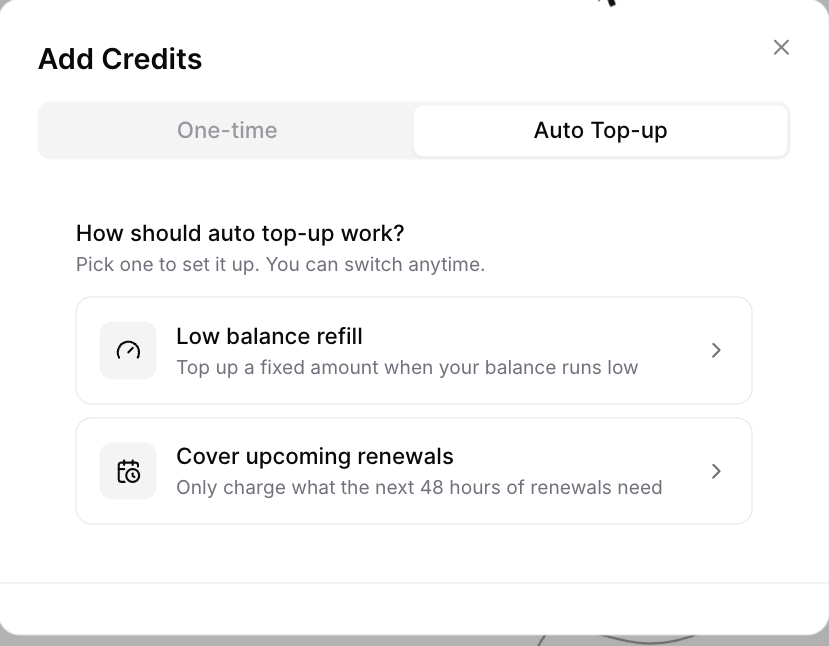
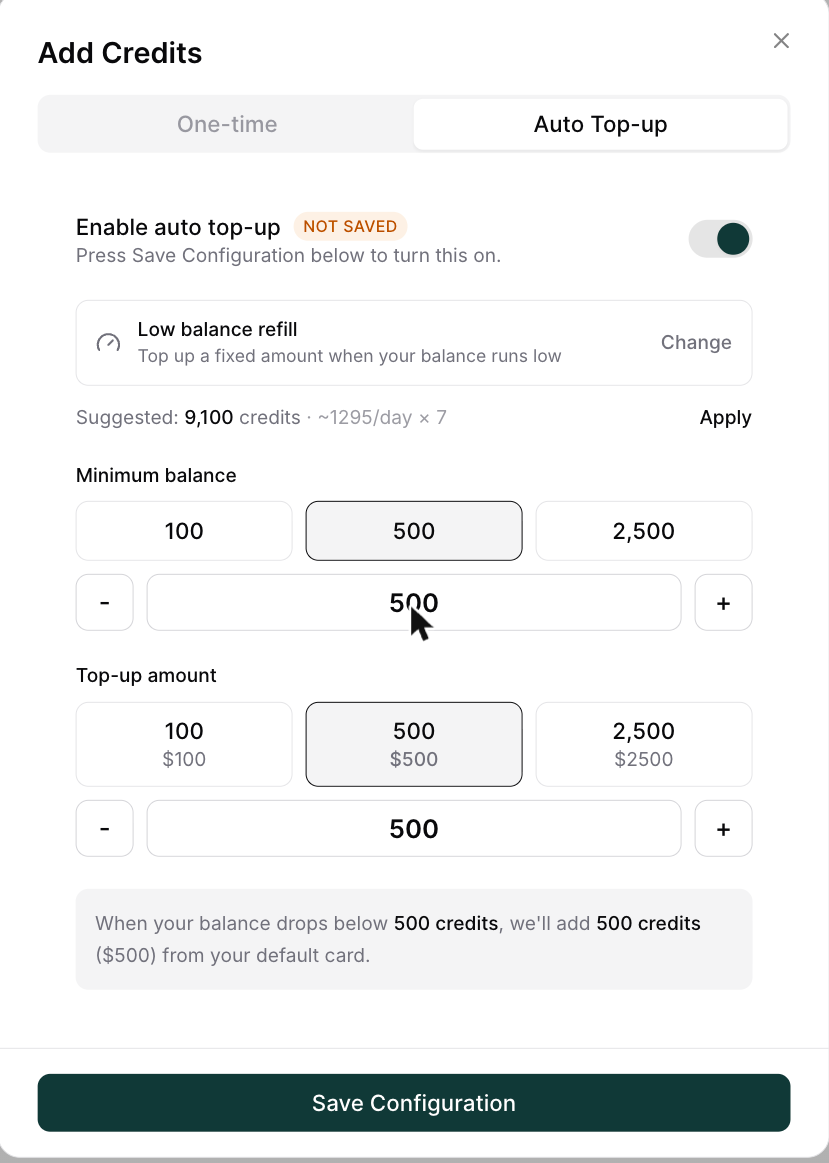
Low balance refill tops up a fixed amount whenever your balance runs low. You set a Minimum balance, which is the level that triggers the charge, and a Top-up amount, which is how much to add. Each field offers 100, 500 and 2,500 presets or a custom figure. The panel then spells out exactly what will happen, for example: when your balance drops below 500 credits, we will add 500 credits from your default card. InboxKit also suggests an amount based on your recent daily burn rate, which you can apply in one click.
Cover upcoming renewals is the alternative. Instead of a fixed figure, it charges only what the next 48 hours of renewals actually need. This suits accounts with uneven renewal schedules.
Whichever mode you pick, you must press Save Configuration to turn it on. The toggle alone shows a NOT SAVED badge until you do. You also need a default card saved in the Stripe Billing Portal, found at Settings > Billing > Open Stripe Billing Portal, before Auto Top-Up can charge anything.
Where to check your billing
Sidebar > Wallet Logs: every top-up, domain purchase, mailbox renewal and auto top-up transaction
Sidebar > Renewals: what is coming up for renewal and what it will cost
Settings > Billing: wallet balance and the Stripe Billing Portal link
Stripe Billing Portal: invoices, payment methods and receipts
Topic 2: What Is Quick Setup?
Video Tutorials: Quick Setup
Quick Setup is a single guided workflow that covers Topics 3 through 6 in one pass. Instead of buying a domain, then creating mailboxes, then connecting a sequencer as separate jobs, you complete all of it in a few minutes and InboxKit provisions everything in the background.
Use Quick Setup when you are starting fresh. Use the individual flows described later when you are adding to an existing setup or need finer control.
The workflow runs across five stages shown at the top of the page: Domains, Mailboxes, Sequencer, Configure and Review.
Running Quick Setup
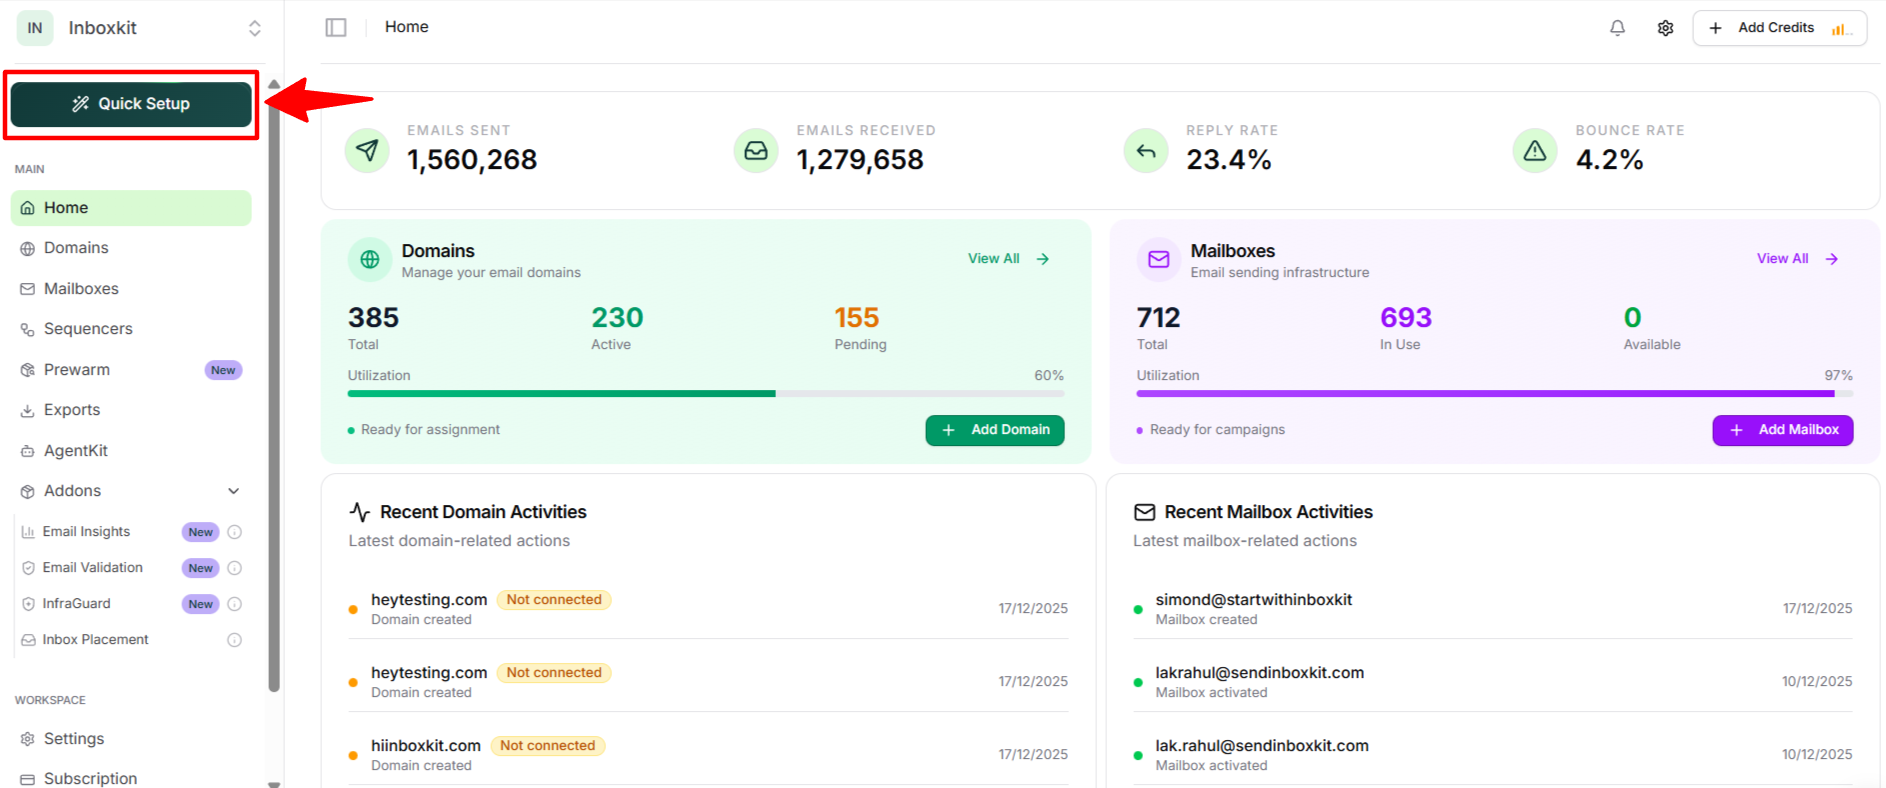
1. Access it. Log in, click Quick Setup in the left sidebar, then Get Started to launch the guided workflow.
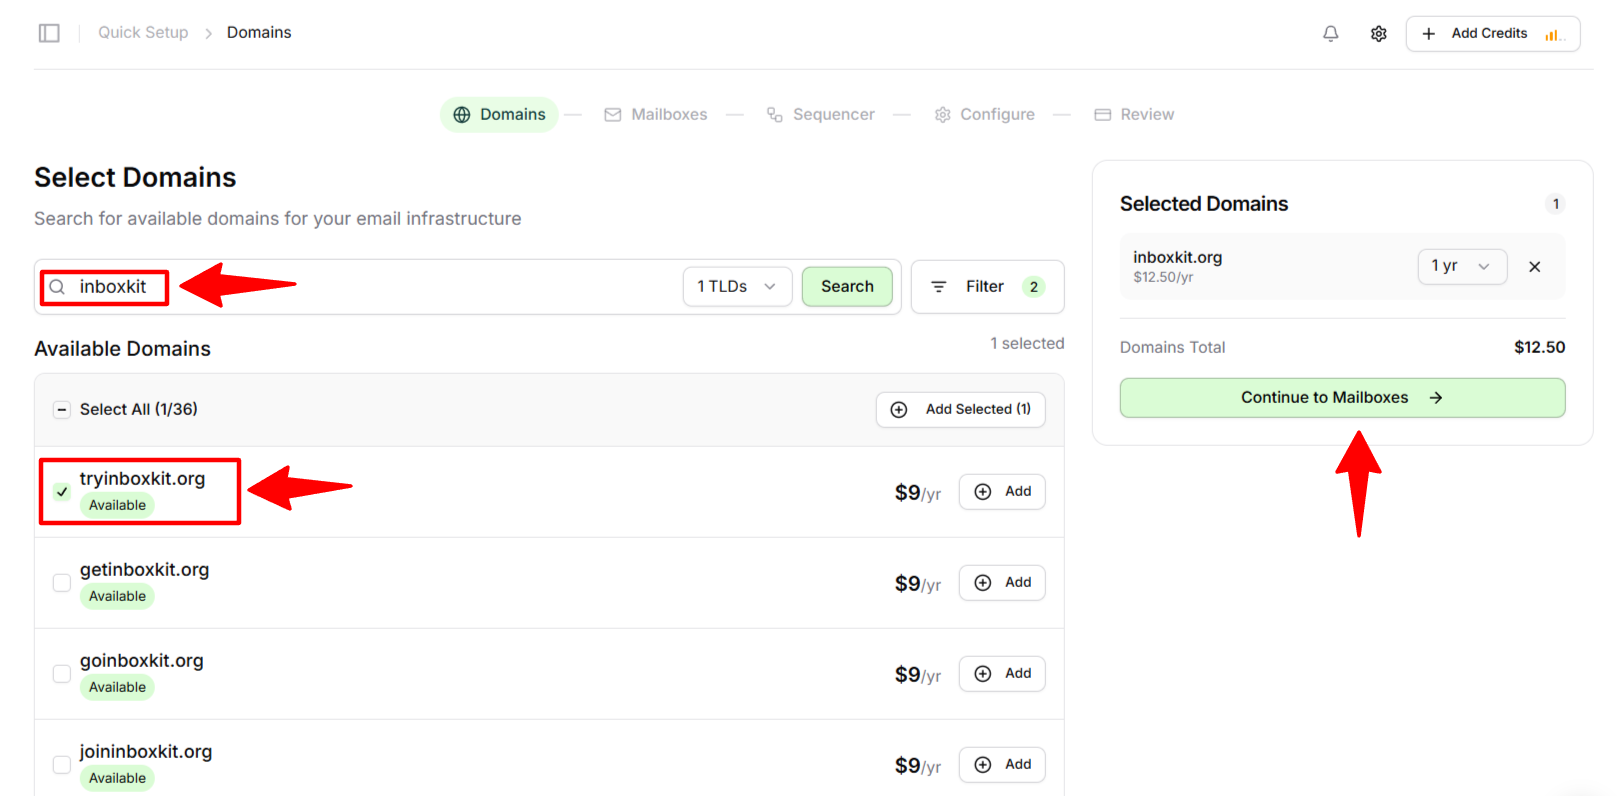
2. Choose your domains. You have two options at this stage.
To buy new domains, search the domain bar, apply filters such as TLD and price, then click Add next to each domain you want. Your selections appear in the Your Cart panel on the right. You can also use Import CSV to check many names at once, or the TLDs and Filters controls to narrow the results.
Already own domains you want to use? Click Have domains? Connect existing above the search area. This lets you bring your own domains into the same flow instead of buying new ones. You will then point your registrar's nameservers at InboxKit, exactly as described in Topic 3.
When your cart looks right, continue to Mailboxes.
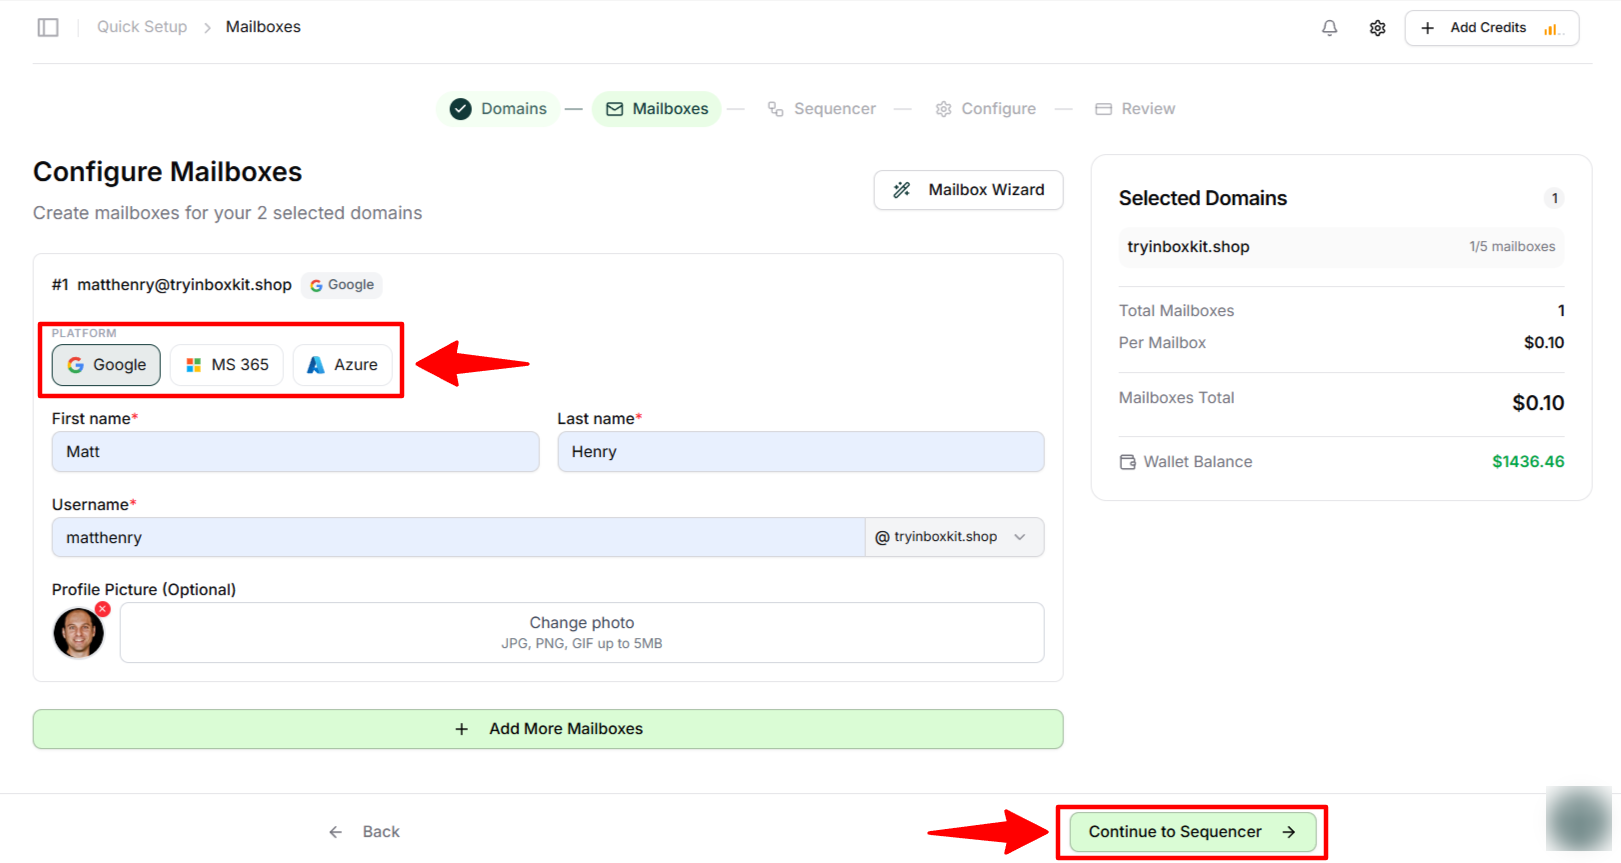
3. Configure your mailboxes. Choose Google Workspace or Microsoft 365, enter the first name, last name and username, and optionally upload a profile photo. Click Add More Mailboxes if you need several, then continue to Sequencer.
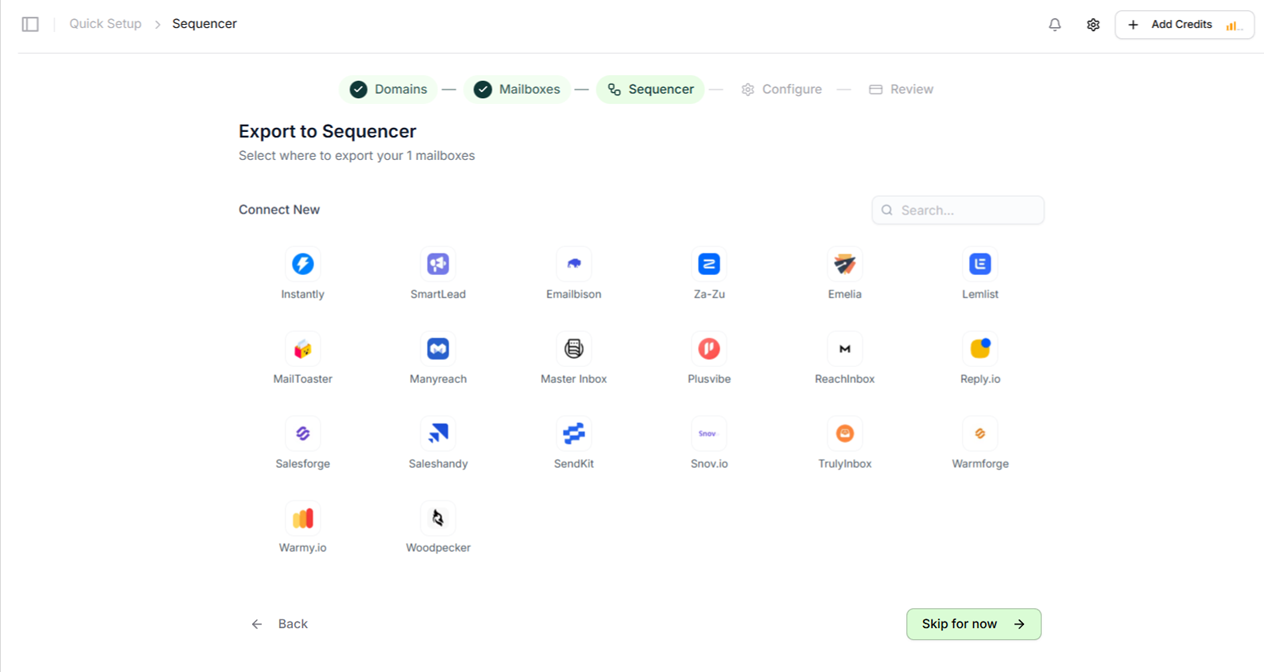
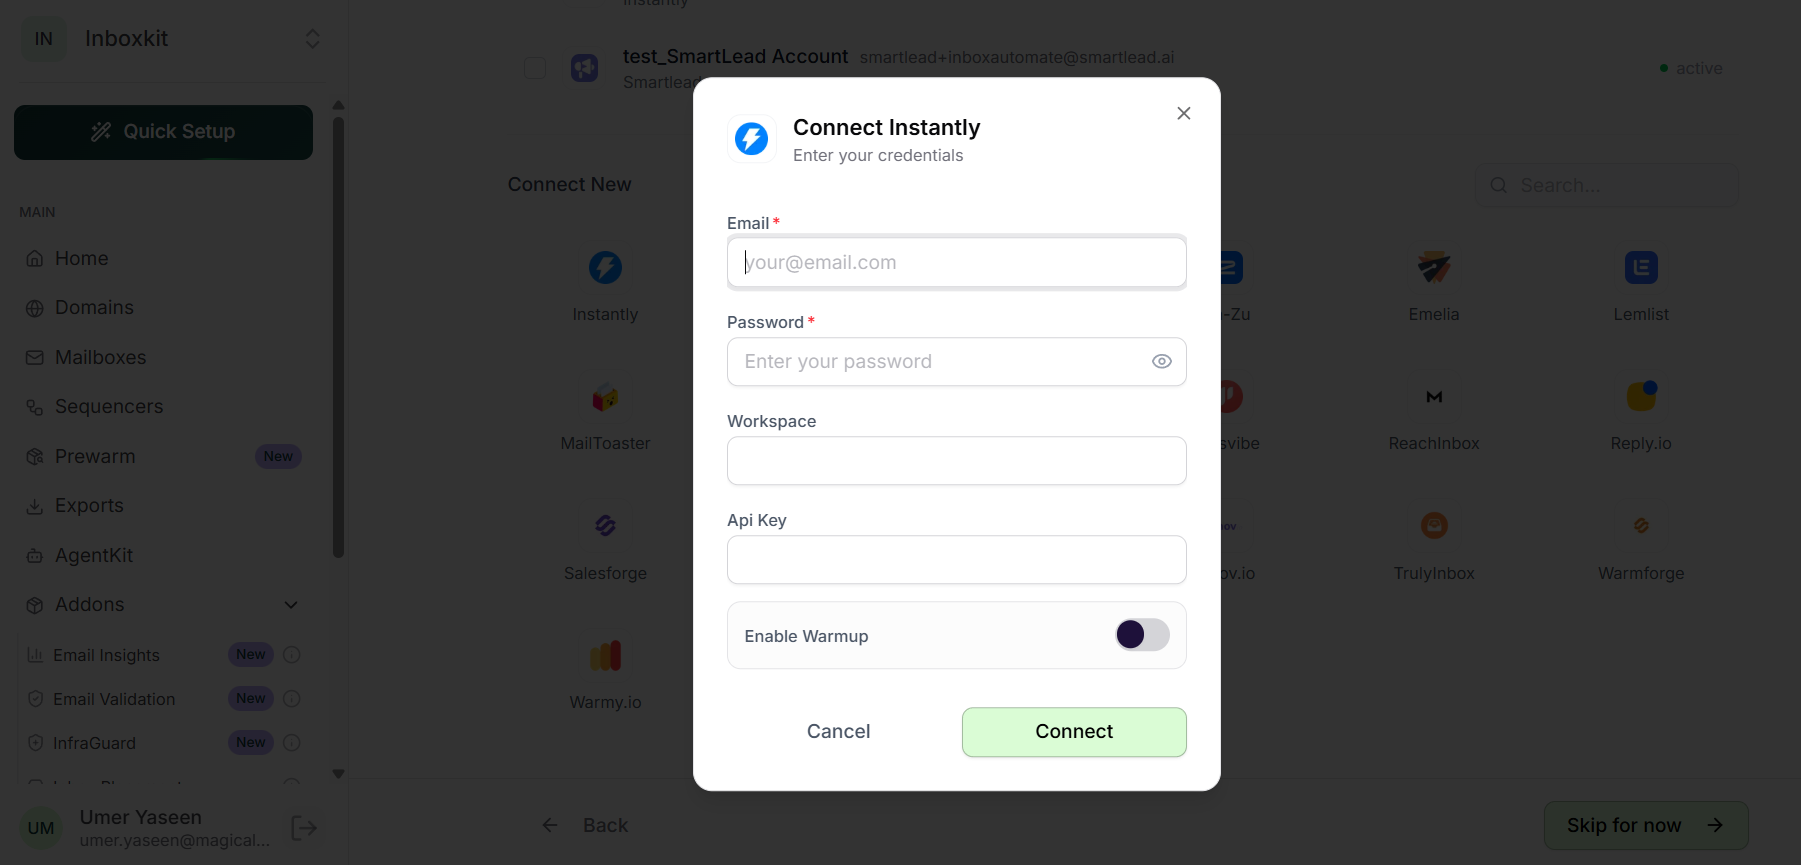
4. Export to a sequencer. Pick your sequencer from the list, enter your sequencer email and password, plus a Google Consent URL if one is required, then click Connect followed by Continue. Click Skip if you do not want to export yet.
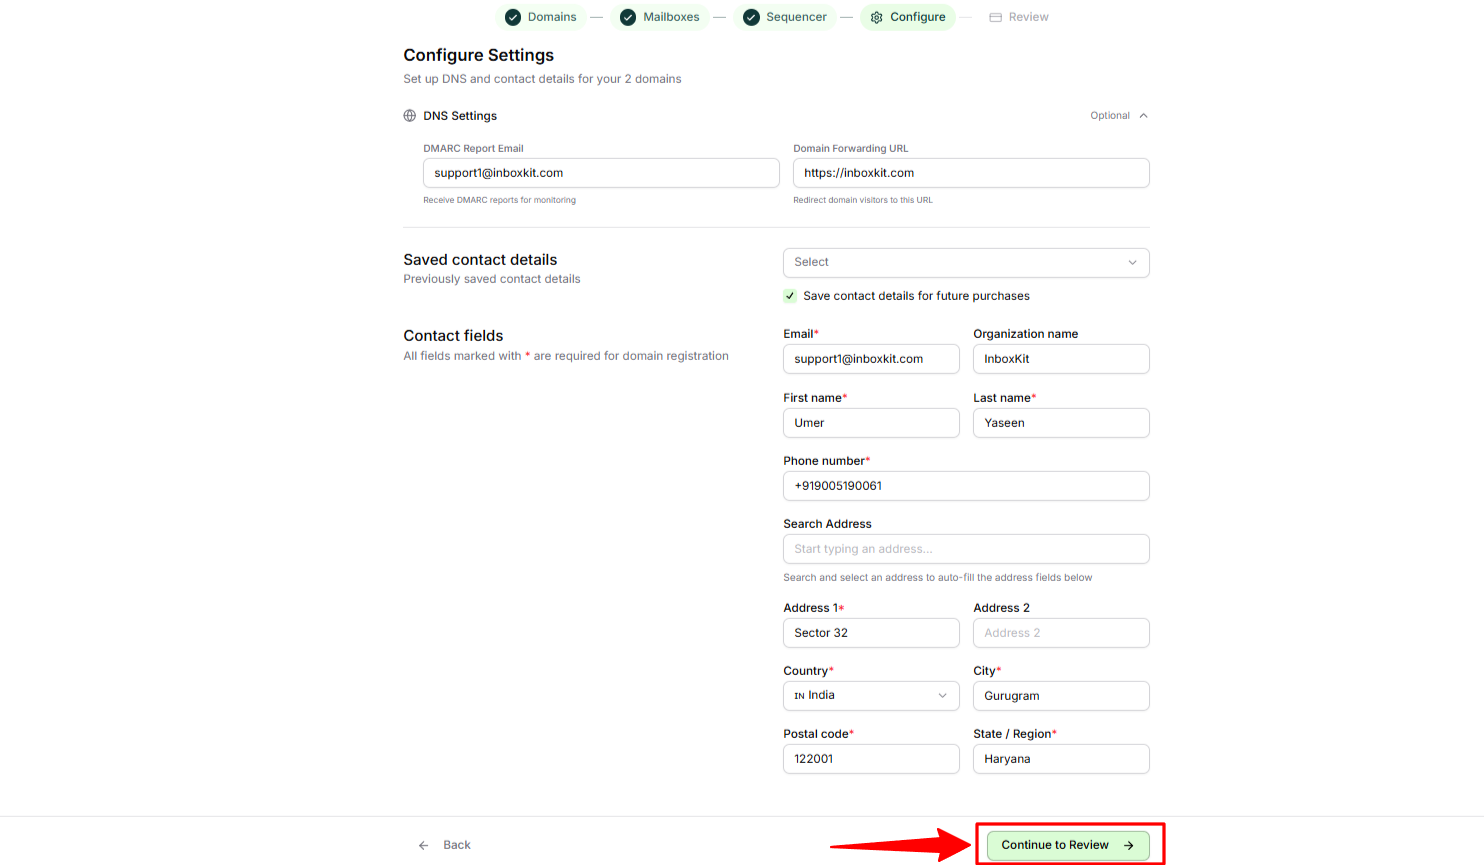
5. Configure domain details. Optionally set a DMARC Report Email and a Domain Forwarding URL, then fill in the required registration contact information, which covers email, name, phone and full address. Tick Save contact details for future purchases to reuse them next time, then continue to Review.
6. Review your order. Check the domains, mailboxes, sequencer export, pricing and any active discounts, then click Ready to Launch.
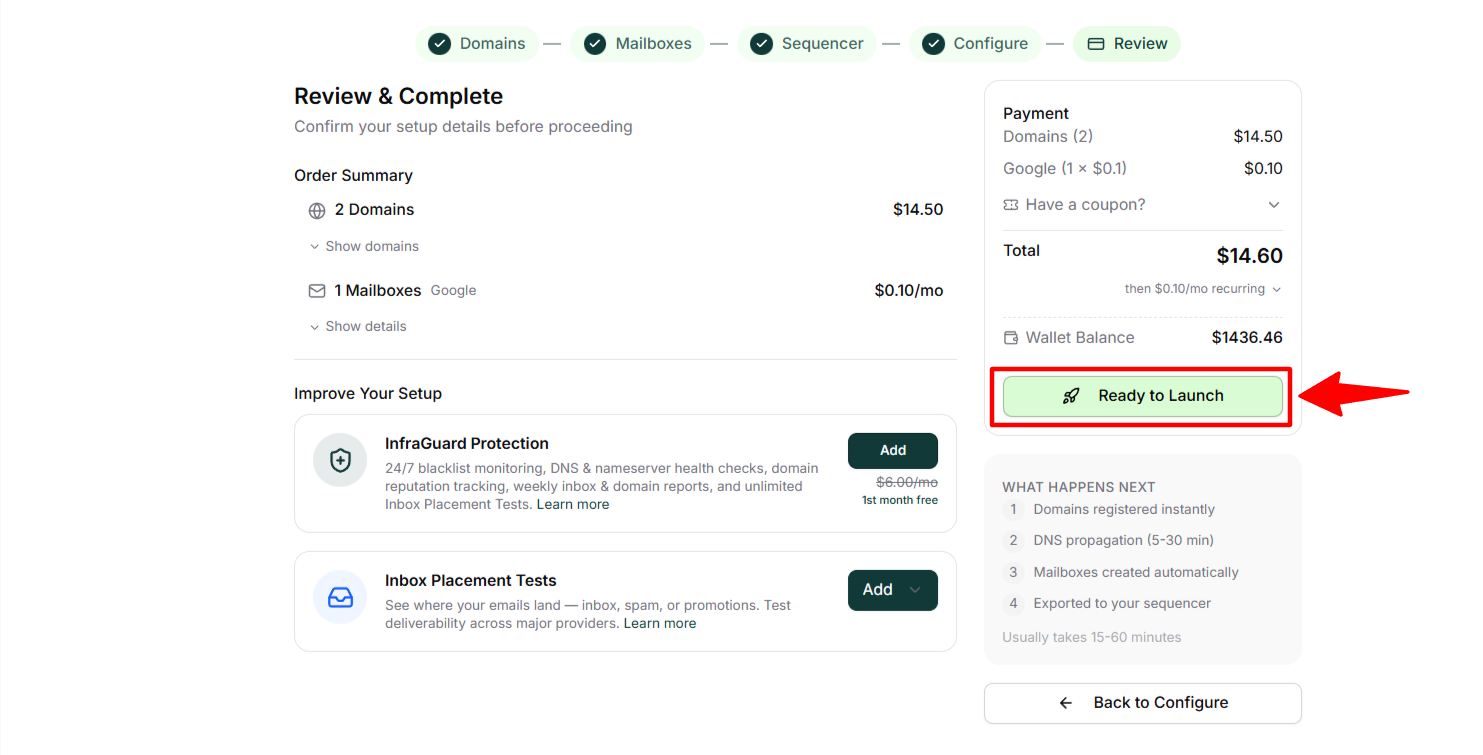
What happens after you launch
The domain is registered instantly.
DNS propagation begins, usually taking 5 to 30 minutes.
Mailboxes are created automatically.
They are exported to your sequencer, if you selected one.
The full process normally finishes within 15 to 60 minutes.
Topic 3: Connect or Purchase Domains
Video Tutorials: How to Buy Domains · Connect Domains
Every mailbox lives on a domain, so domains come before mailboxes. You have two routes: buy a new domain inside InboxKit, or connect one you already own.
Either way, InboxKit configures SPF, DKIM, DMARC and MX automatically on the backend. You never edit DNS records by hand.
Option A: Buy a new domain
The flow is Search Domain, DMARC Setup, Contact Information, Checkout, shown as four steps across the top of the page.
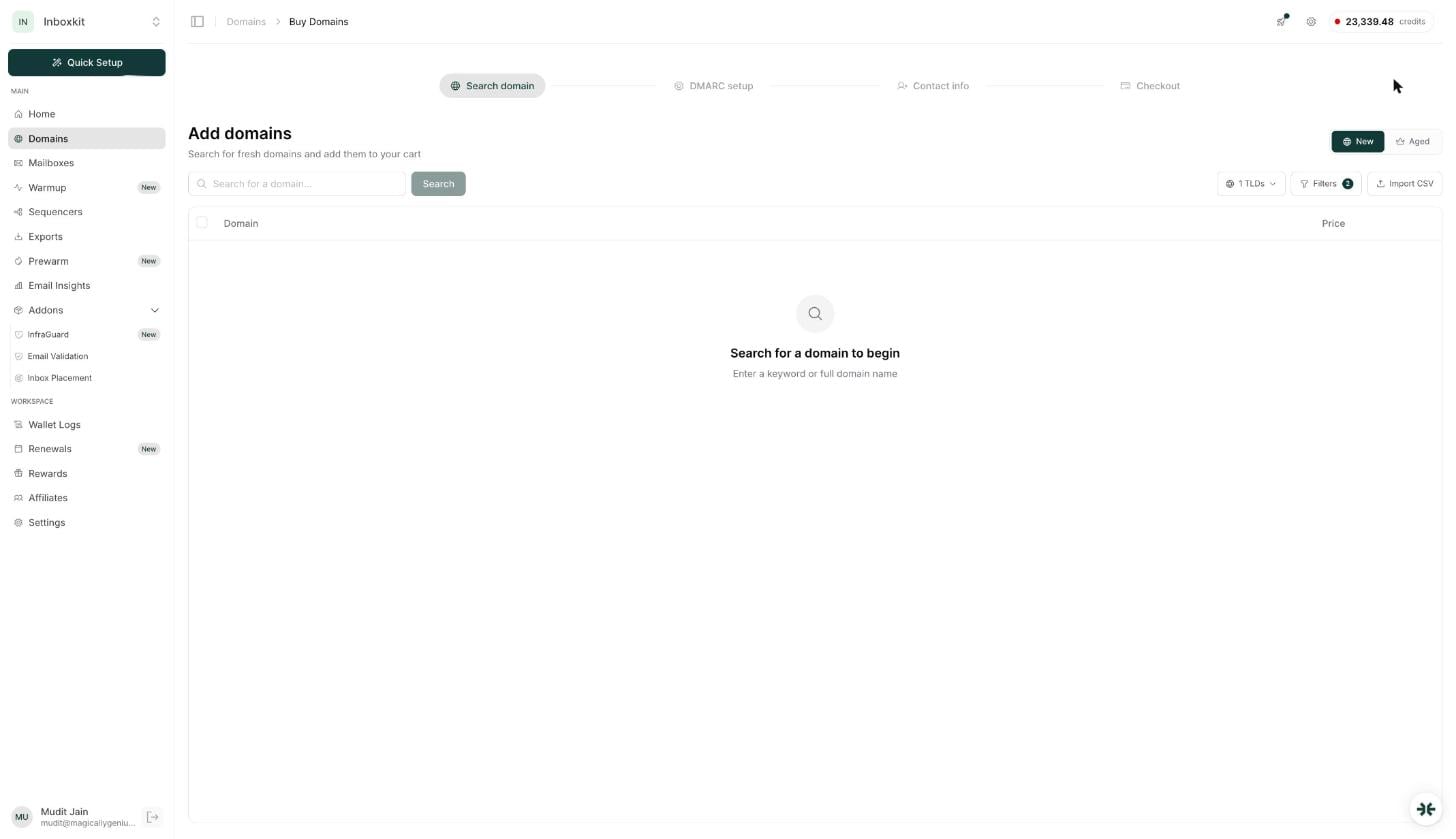
Go to Domains > Buy Domains from the left navigation.
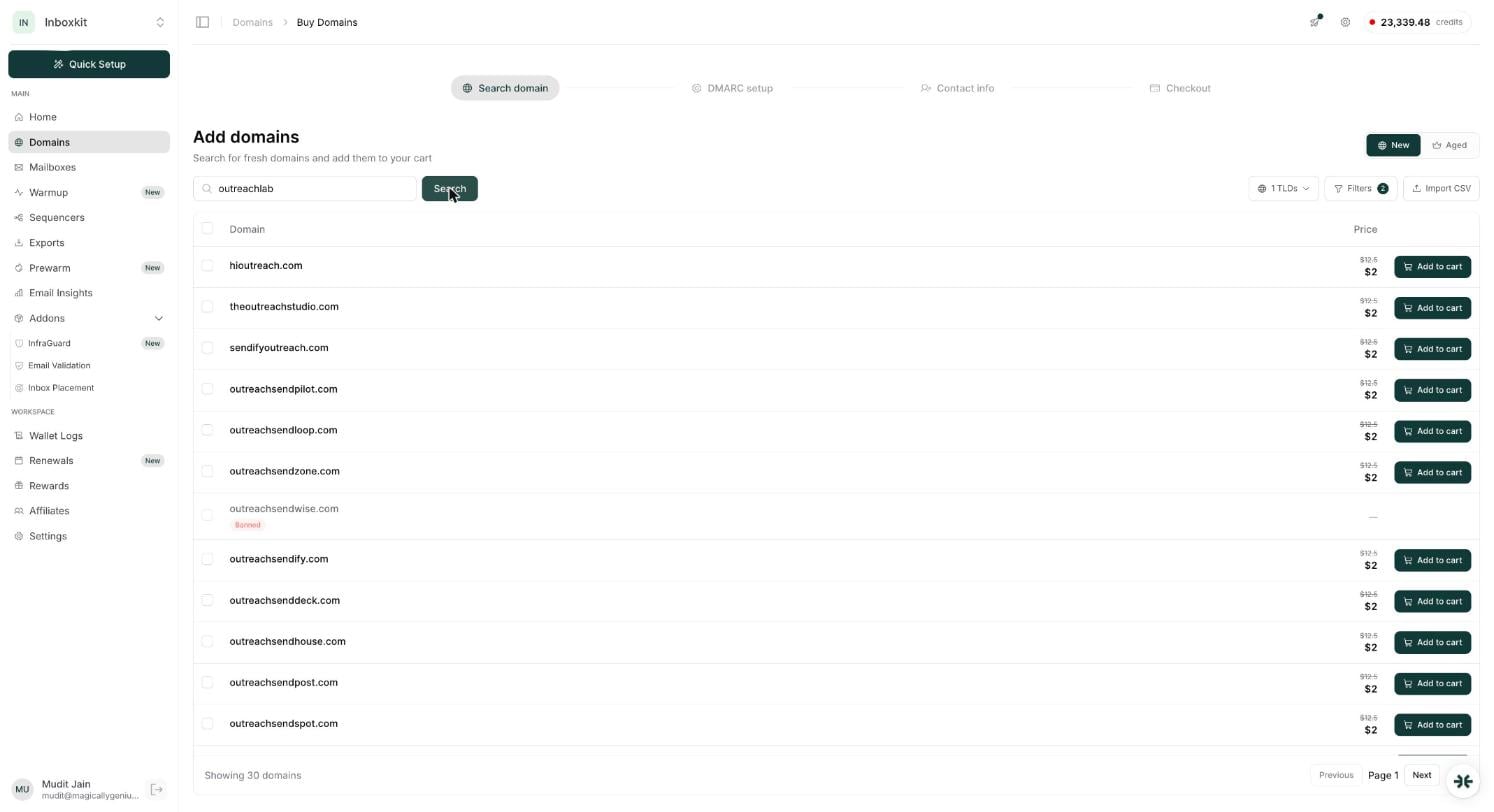
Search for available domains. Type the name you want, then select which TLDs to search. Prices appear next to each result and vary by TLD and by any promotion running at the time. You can select multiple TLDs at once, and toggle between New and Aged domains.
Apply filters so you only see domains you can actually use. The options are Show unavailable domains, Check Google Workspace availability and Check Microsoft 365 availability. Use Import CSV to check or buy in bulk.
Add to Cart, then click Next.
Set up DMARC and forwarding. This step is optional. Set a Domain Forwarding URL so visitors to the domain land on your main site, which we recommend, a DMARC Email to receive authentication reports, and Mask Forwarding to hide the destination URL in the browser bar.
Enter contact information. Domain registration legally requires valid details: email, first and last name, organization (optional), phone, address, country, state, city and postal code. You can reuse saved details or tick Save contact details for future purchases.
Review and checkout. Confirm the domains, settings, contact information and total, choose Use Wallet Balance or card checkout, then click Checkout.
After purchase the domain enters Pending, DNS is applied automatically, and it becomes Active within about an hour, ready for mailbox creation.
Option B: Connect an existing domain
This works with Namecheap, GoDaddy, Porkbun, Hostinger, IONOS, Dynadot and other registrars. The flow is Connect, Update Nameservers, Verify, Activate.
Go to Domains > Connect Existing.
Add your domains in one of three ways. Type them one at a time and press Enter, paste 2 to 50 domains with one per line, or click Upload CSV File for up to 250 domains. Then click Connect.
Copy the nameservers InboxKit generates, for example
ns1.inboxkit-dns.comandns2.inboxkit-dns.com.Update the nameservers at your registrar. Delete the registrar's existing nameservers, add the two InboxKit ones, and save.
Enable Auto-sync (optional). Click Enable Auto-sync and sign in with your registrar so InboxKit updates nameservers automatically. Supported registrars are Porkbun, GoDaddy, Spaceship, Dynadot, Name.com and Namecheap. Any other registrar needs the manual update described in step 4.
Verify the status. Scroll to Connected Domains, find the domain and click Check. The statuses are Not Connected, meaning nameservers have not been updated yet, Checking, meaning verification is in progress, and Active, meaning propagation succeeded. You can bulk-check using Bulk Sync > Select All Not Connected.
Only Active domains can be used for mailbox creation.
Two things catch people out. Nameservers must be updated at your registrar within 12 hours of connecting, otherwise the domain auto-expires and must be re-added, which you can do at any time. Also, domains hosted on Cloudflare cannot be connected, because Cloudflare does not allow nameserver replacement.
Full nameserver propagation can take 24 to 48 hours, though it is often much faster.
Per-domain settings you can change later
Go to Domains, click More on any domain, then open the Domain Settings tab:
Domain Forwarding URL: redirect visitors to your main site or landing page. Toggle Mask Forwarding on to keep your domain visible in the address bar after the redirect.
Catch-all Email: collects mail sent to any mistyped or non-existent address on the domain. The inbox you name here must already exist, because InboxKit does not create it.
DMARC Email: where DMARC reports are delivered. It does not need to be on the same domain, so any valid address works.
Changes take effect within a few minutes as InboxKit updates DNS in the background.
Topic 4: Purchase and Manage Mailboxes
Video Tutorials: How to Buy Mailboxes · Mailbox Settings
Once a domain is Active, you can add mailboxes to it.
Choosing a platform
InboxKit supports three platforms, and capacity differs significantly between them.
Google Workspace and Microsoft 365: up to 5 mailboxes per domain.
Azure: up to 100 mailboxes per domain, billed at $30 per domain per tenant, which covers all mailboxes on that Azure domain rather than each one. Although the technical ceiling is 100, we recommend 50 mailboxes per tenant for healthy, sustainable sending. Plan on roughly 2 cold emails plus 5 warm-up emails per mailbox per day, so 50 mailboxes on one tenant supports about 350 emails per day. These are recommendations rather than hard caps.
The platform selector shows the current rate under each option, so check there before you buy, because promotional pricing runs from time to time.

Buying mailboxes
Go to Mailboxes > Buy Mailbox.
Choose your platform: Google Workspace, Microsoft 365 or Azure.
Enter mailbox details: first name, last name, username (for example "john" becomes [email protected]), the domain to assign it to, and an optional profile photo. Click Add More Mailboxes to bulk-add, or Import CSV to upload many at once. On Azure you instead pick a quantity. The Mailbox wizard button walks you through the same process step by step if you prefer.
Click Next: Checkout, review the order summary, select Use wallet balance if you want, then click Confirm Purchase.
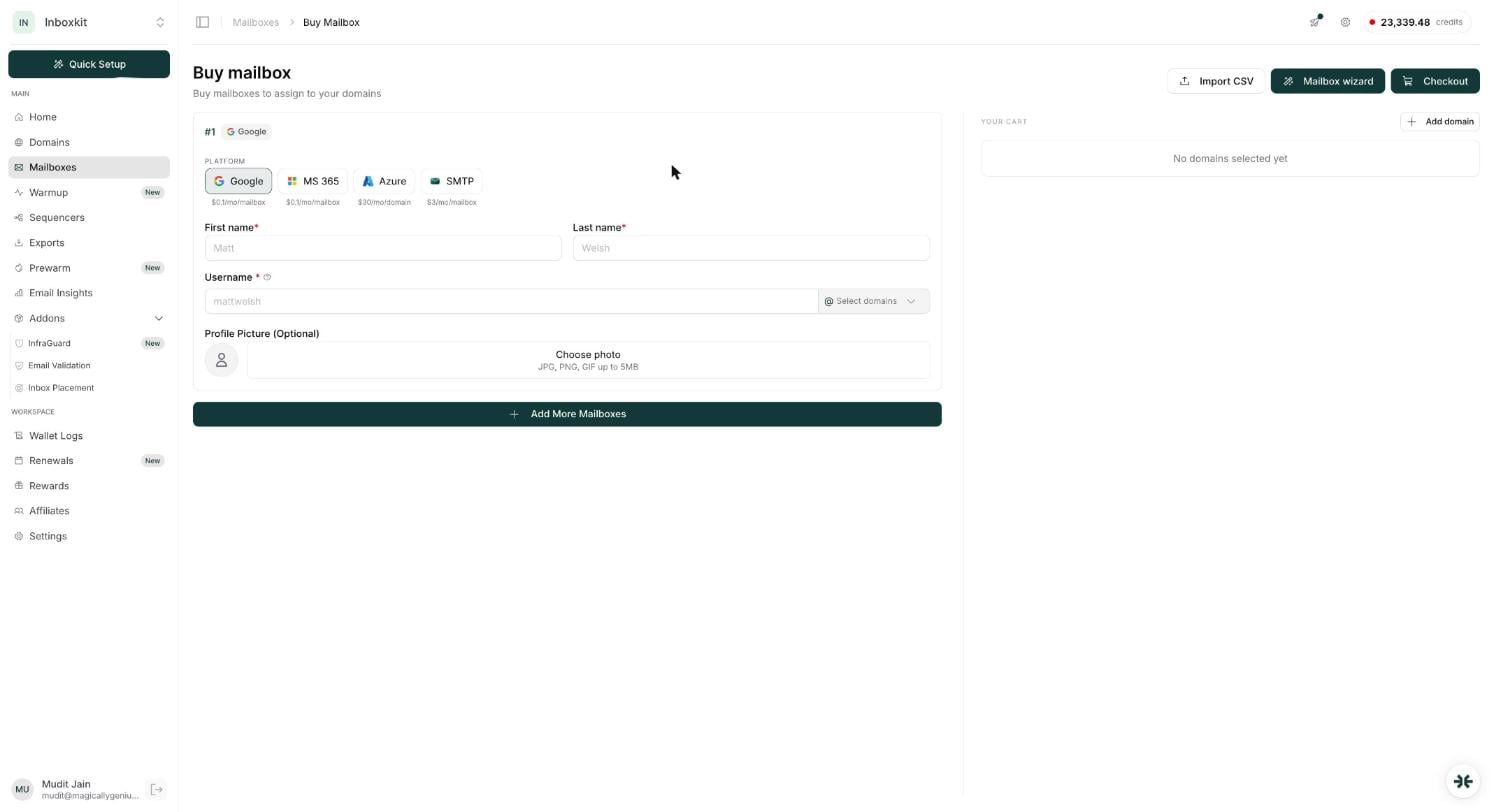
Mailboxes do not go live instantly. They move through Scheduled, Configuring and Processing while InboxKit creates the account, applies DNS and activates the mailbox. This normally takes 30 minutes to 6 hours, with larger batches at the longer end. You will get a notification in InboxKit once they are Active.
Mailbox statuses, and what to do about each
Status | What it means | What to do |
Active | Live, sending and receiving normally | Nothing |
Configuring, Processing or Scheduled | Being provisioned right now | Wait, as this is only a problem past 6 to 8 hours |
Disconnected | OAuth token expired, usually after a password or policy change | Reconnect from the dashboard |
Scheduled for Cancellation | You chose to remove it, and it stays fully active until just before its next renewal | Nothing, it deletes itself |
Renewal Failed | Wallet lacked credits at renewal time | Add credits and recover it, because this is time-sensitive |
Suspended (permanent) | Recovery window closed, so Google or Microsoft disabled it | Migrate to the other platform, or delete and recreate |
The one deadline that matters: a Renewal Failed mailbox is recoverable for roughly 10 days from the failed renewal date. After that the provider suspends it permanently and it cannot be reversed. Auto Top-Up, covered in Topic 1, is how you make sure you never see this status.
If provisioning is stuck past 6 to 8 hours, the usual cause is that the domain is already tied to a previous Google Workspace, either an older InboxKit account of yours or an entirely separate workspace. Check the Domains tab for an "already in use" message. If it is an old InboxKit workspace, contact support to free it from the backend. If it is an external Google Workspace, you will need Google's Domain Recovery form, which Google typically clears in 24 to 48 hours. A "Domain is unsupported" message means that domain or extension cannot host Google Workspace or Microsoft 365 mailboxes, and buying a different domain is faster than troubleshooting it.
Using your mailboxes
Editing mailbox details. Go to Mailboxes > More > Settings to change:
Profile picture: upload a JPG, PNG or GIF up to 5MB, or click Generate GIF for an AI-generated animated avatar. This is what recipients see in Gmail and Outlook.
Username: the local part of the address. Changing it changes the actual login email for the mailbox.
Sender name: first and last name, as shown in recipients' inboxes.
Click Save Changes when done, or Reset to discard your edits.
Important: after editing any mailbox detail you must run a new export for the change to reach your sequencer. InboxKit does not automatically re-sync updated identities into existing sequences.
Logging in manually. Go to Mailboxes > More > Credentials to see the email address, password and a live one-time password for two-factor authentication, along with a countdown timer. Log in at mail.google.com for Google Workspace or outlook.office.com for Microsoft 365, using the password and OTP from that panel. The OTP refreshes every 30 seconds, so always use the latest one. Microsoft and Azure mailboxes may not offer direct login in the same way. Never reset the password manually in Gmail or Outlook, because that will break the integration. Always use the password InboxKit provides.
Deleting mailboxes. Go to Mailboxes > More > Settings and scroll to the Danger Zone.
Deleting a non-admin mailbox schedules it for cancellation. It stays active until a few hours before the next renewal, so you get the full value of what you paid for, then it is permanently removed. Your domain stays intact and the mailbox stops being billed from the next cycle. This is safe to do at any time, and it is the right way to rotate or replace mailboxes.
Deleting the admin mailbox deletes the entire domain setup, including every mailbox on that domain, its DNS configuration, routing, warm-up data and sequencer connections. This cannot be undone. Each domain has exactly one admin mailbox. Only delete it if you intend to remove the whole domain from InboxKit.
Topic 5: Add Your Sequencer and Enable Auto-Export
Video Tutorials: Sequencer Connections
A sequencer is the outreach tool you actually send campaigns from. Connecting it once lets InboxKit push mailboxes into it automatically.
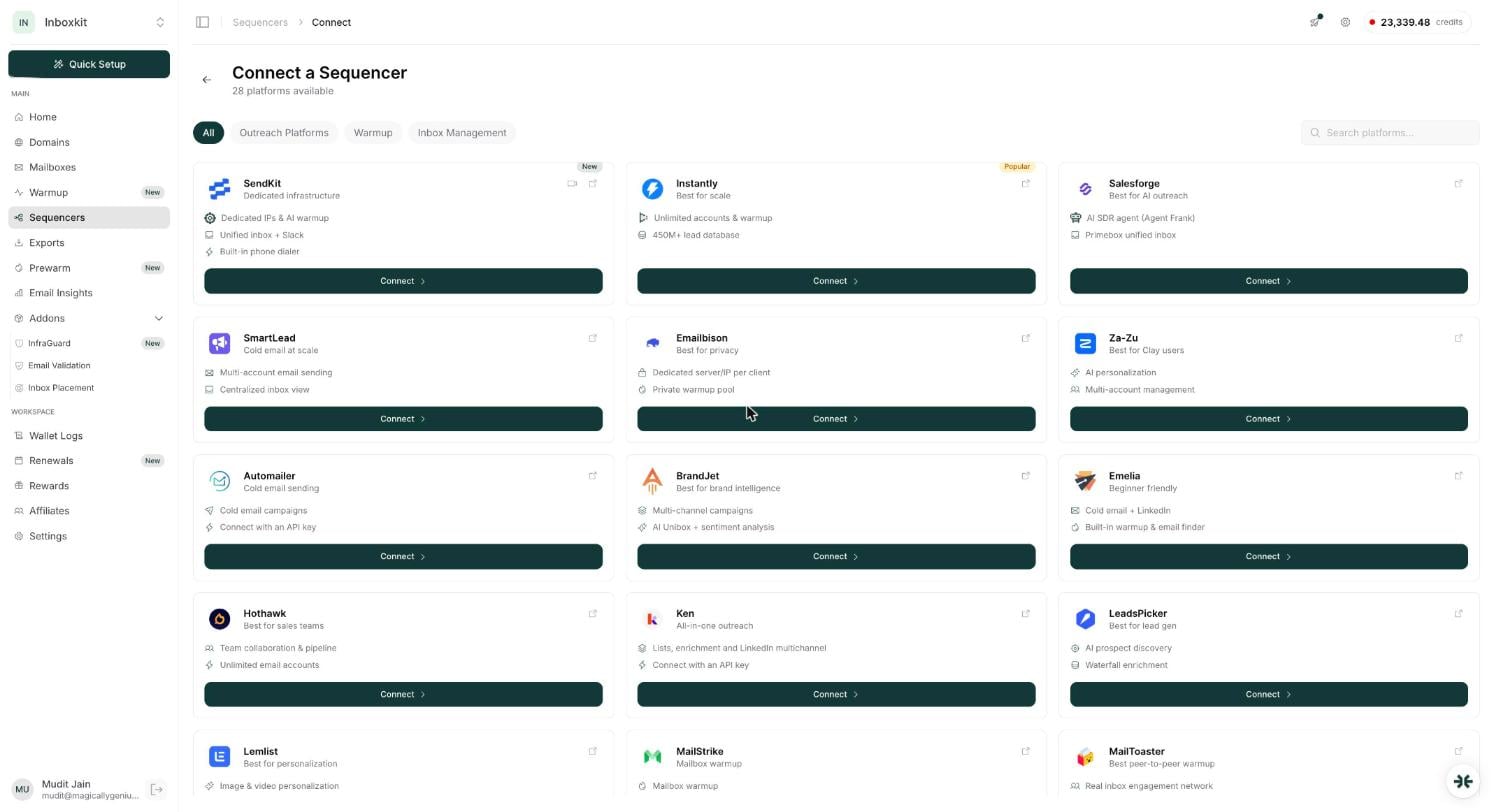
InboxKit integrates natively with 28 platforms, including SendKit, Instantly, SmartLead, Salesforge, Emailbison, Za-Zu, Emelia, Lemlist, MailToaster, Reply.io, Saleshandy, Snov.io and Woodpecker. The catalogue is filterable by Outreach Platforms, Warmup and Inbox Management, so you can narrow it to the kind of tool you are connecting.
Connecting a sequencer
Go to Sequencers in the left sidebar and click Add Sequencer.
Select your platform from the list.
Enter your credentials, meaning the email and password you use to log into that platform. Some platforms ask for extra fields, such as a Workspace Name for Instantly if you use multiple workspaces, which is case-sensitive and must match exactly, or a Consent URL for SmartLead and others when the platform provides one.
Click Connect.
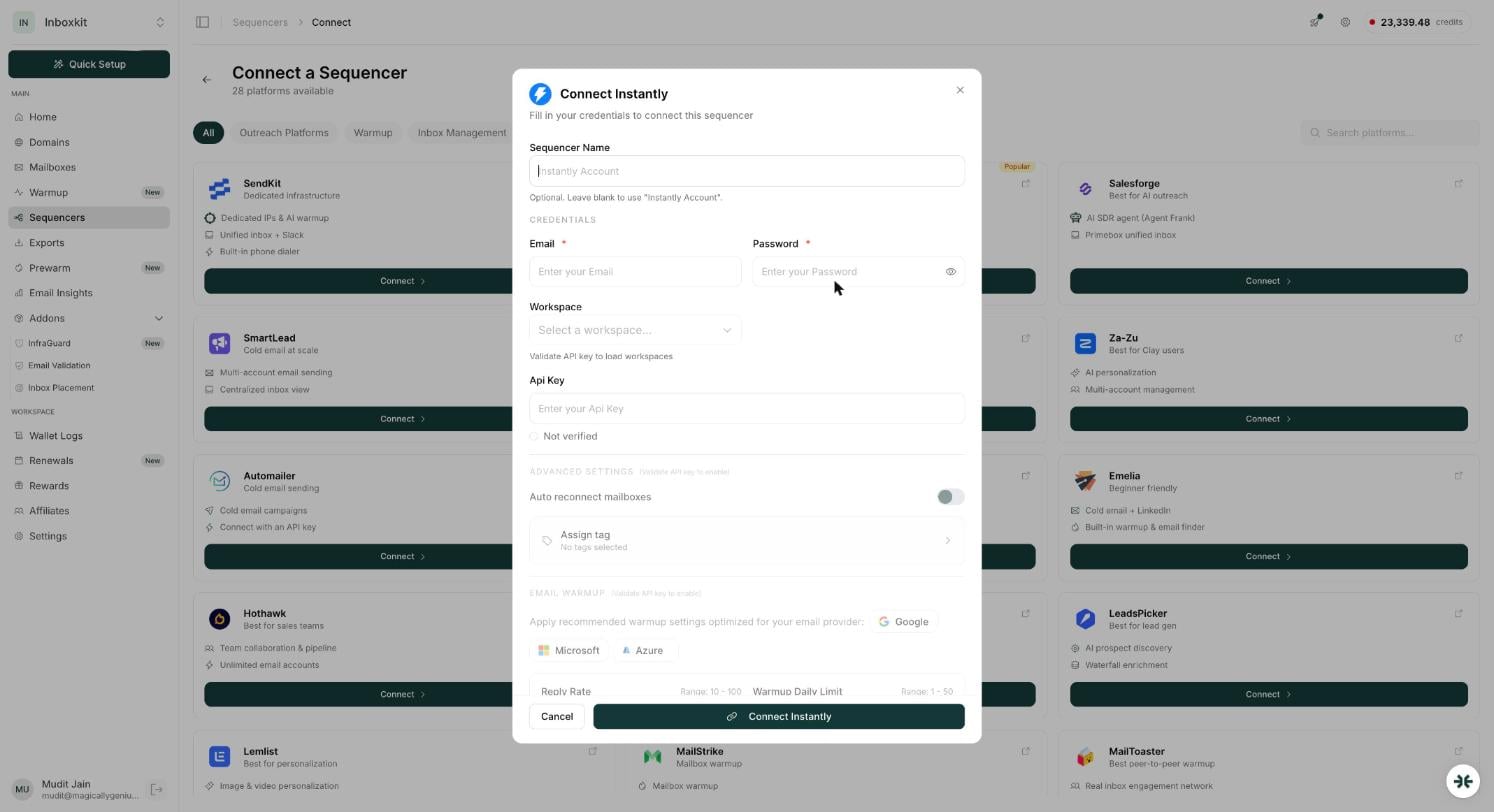
The connection dialog also exposes several optional settings worth knowing about. You can give the connection a Sequencer Name if you are linking more than one account on the same platform, turn on Auto reconnect mailboxes, use Assign tag to label everything that comes through this connection, and apply recommended warm-up settings tuned per provider for Google, Microsoft or Azure, including reply rate and daily warm-up limit.
Once saved, the sequencer appears in your Sequencers list with a connected status.
Enable Auto-Export (recommended)
With Auto-Export on, every new mailbox you purchase syncs into your sequencer automatically as soon as it goes Active, so you do not need a manual export job each time you scale.
Go to Sequencers, open your sequencer, then Settings, and enable Auto Export.
Topic 6: Initiate Exports
Video Tutorials: Sequencer Connections
Auto-Export covers new mailboxes. Run a manual export when Auto-Export is off, when you are exporting existing mailboxes for the first time, or whenever you have edited mailbox details and need the changes to reach your sequencer.
Go to Exports in InboxKit.
Click Create Export.
Select your sequencer.
Select the mailboxes you want to export.
Click Create Export Job.
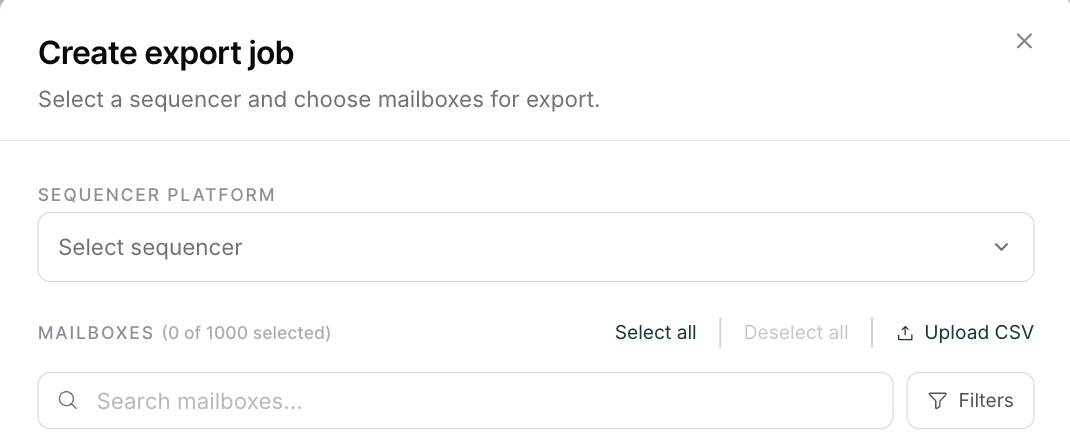
You can also click Select all, narrow the list with Filters, or use Upload CSV to specify exactly which mailboxes to push.
Exports usually complete within 5 to 30 minutes, after which the mailboxes appear in your sequencer's sending accounts, ready for campaigns.
Why exports fail
Nearly every failed export comes down to one of four causes:
Incorrect credentials. The email, password or workspace name does not match the sequencer account exactly. Workspace names are case-sensitive.
No active subscription on the sequencer. The platform must have a live plan for API-based mailbox imports to work.
Two-factor authentication enabled. Most sequencers do not support API login or mailbox sync while 2FA is on. Disable it temporarily, run the export, then re-enable it.
Account limits reached. Your sequencer plan has hit its mailbox or workspace cap, so no new mailboxes can be added.
Topic 7: Purchase Pre-Warmed Mailboxes
Video Tutorials: How to Buy Mailboxes
A brand-new mailbox needs weeks of gradual warm-up before it can send at full volume. Pre-warmed mailboxes skip that entirely.
What they are
Pre-warmed mailboxes are mailboxes InboxKit has already warmed on its own infrastructure before you buy them. They arrive with established sender reputation, stable inboxing performance and no ramp-up period, so you can start campaigns the day you buy them.
Normal mailbox | Pre-warmed mailbox | |
Warm-up required | Yes | No |
Start sending immediately | No | Yes |
Weeks of warm-up included | None | Typically 9 to 10 weeks |
Username change allowed | Yes | Strongly discouraged |
Best for | Long-term sending | Instant sending |
How to buy them
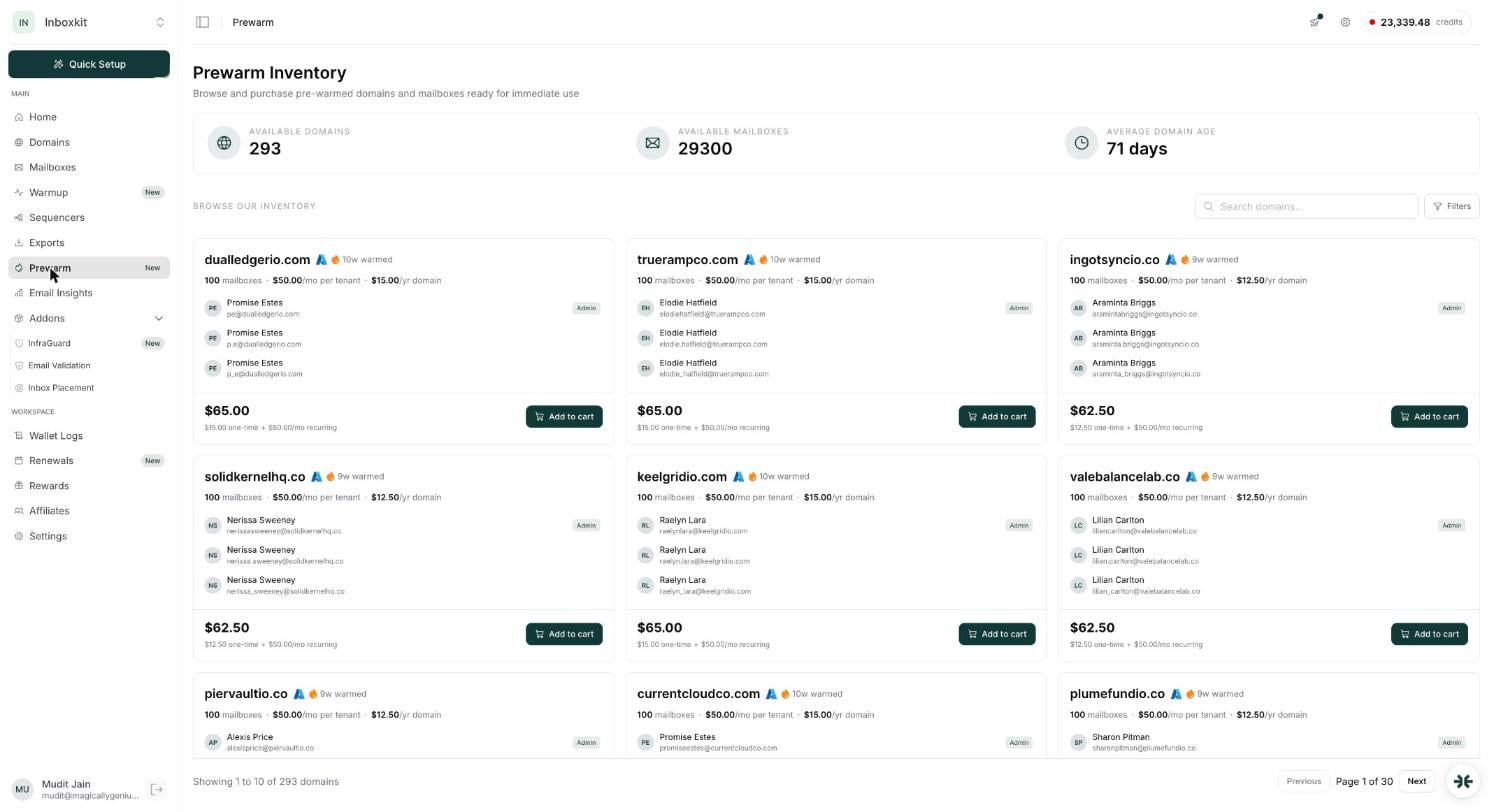
Go to Prewarm in the left navigation to open the Prewarm Inventory.
Browse the available domains. The header shows how many domains and mailboxes are currently in stock, along with the average domain age. Each card lists the domain, how many weeks it has been warmed, the mailboxes it includes, and the price split into a one-time domain fee plus a recurring per-tenant charge.
Use Search or Filters to narrow the inventory to what you need.
Click Add to Cart on the domains you want.
Open the checkout page from the cart, set a Domain Redirect URL, and optionally adjust the sender names.
Confirm the purchase. The checkout shows the total, your wallet balance, and the option to keep warming the mailboxes while you send.
Orders are processed within minutes and the mailboxes appear under Mailboxes, ready to export.
The one rule that matters
Do not change the username unless you absolutely must. The warm-up reputation is attached to the existing address. Renaming [email protected] to [email protected] creates a new mailbox identity, so the warm-up history no longer matches, reputation resets, and you need a fresh warm-up cycle. That defeats the point of buying pre-warmed. If you need a specific username format, buy fresh mailboxes and warm them normally instead.
Topic 8: Warm Up Your Mailboxes
Video Tutorials: Warmup
Warm-up builds sender reputation by exchanging genuine-looking email between mailboxes in a trusted network, gradually increasing volume until the mailbox can sustain full sending. A brand-new mailbox that starts blasting cold email without warm-up will land in spam and can be throttled or blocked outright.
InboxKit includes built-in warm-up at $3.00 per mailbox per month, charged from your wallet credits like everything else.

Getting started
Go to Warmup in the left sidebar.
Click Add Mailboxes and select the mailboxes you want to warm.
Warm-up begins automatically and ramps the daily volume up over time.
Reading the warm-up dashboard
Each row shows the mailbox, its status, the day it is on in the warm-up cycle, the current ramp (for example 10 moving toward a target of 25 per day), the percentage landing in the inbox, the percentage going to spam, and a rolling health bar. You can filter the list, apply tags, and use Warmup code to verify a mailbox.
Warm-up best practices
Never run two warm-up tools on the same mailbox at once. This doubles your sending volume against the same daily limit and can trigger the exact throttling it is meant to prevent, actively damaging reputation rather than helping it. If your sequencer has its own warm-up, pick one tool and disable the other.
Allow 21 to 28 days of warm-up on a brand-new mailbox before sending at full volume.
Start cold sending small, at roughly 20 to 25 emails per day, and scale gradually while warm-up continues in the background.
Keep warm-up running even after you start campaigns. The two work together.
Watch the spam percentage. A rising spam rate is an early warning that something is wrong with your domain configuration or content.
Topic 9: Add-Ons
Video Tutorials: InfraGuard · Inbox Placement Test
Add-ons are optional services that sit on top of your infrastructure. You will find them under Addons in the left sidebar, and they are all paid from your wallet credits.
InfraGuard
InfraGuard is complete domain protection. It combines blacklist tracking, a DNS watchdog, bounce monitoring and unlimited Inbox Placement Tests, so problems surface before they damage your sending reputation.

What it monitors:
Blacklist Monitor: checks over 100 blacklists hourly
DNS Watchdog: checks MX, SPF, DKIM and DMARC every 10 minutes
Bounce Monitor: detects hard and soft bounce rate spikes
Unlimited Inbox Placement Tests: both scheduled and instant
Alerts and recommendations telling you exactly how to fix what it finds
How to enable it:
Go to Addons > InfraGuard and click Add Protection.
Select the domains to protect. You can pick one or many at once, and filters help you target domains that are active, blacklisted or showing high bounce.
Configure inbox placement testing. Choose a test day and a frequency of weekly or biweekly, then choose which receivers to test against: Personal Gmail, Google Workspace, Personal Outlook and Microsoft 365.
Confirm and activate. Review what is included, then click Add Protection.
Understanding the statuses. A protected domain shows Pending while tests sync and the first report is pending, Match when DNS and configuration are aligned and healthy, and Changed when DNS or reputation metrics have deviated and need action.
Using the dashboard. Click View on any protected domain. The Health Overview tab shows the overall health score, blacklist result, DNS watchdog state, bounce percentages, an inbox versus spam summary and an activity timeline. The IPT Results tab shows inbox performance across Gmail, Outlook, Microsoft and Workspace. You can run a test immediately with Run IPT Now, change the schedule and receivers, and review the last 7, 30 or 90 days.
Managing alerts. Click Actions on the main InfraGuard screen to see alerts grouped as Critical, which needs immediate action, Warning, which you should review soon, and Advisory, which is informational. Each alert names the type, explains the problem and gives a recommended resolution, which you can then view, resolve or dismiss. You can also pull reports into Slack with Slack Reports, or use Download Report.
Inbox Placement Tests
Inbox Placement Tests measure where your email actually lands across major mailbox providers, by delivering to a global seed network and reporting back.

What you get: your inbox rate, spam rate, missing rate, authentication status for SPF, DKIM and DMARC, provider-by-provider placement across more than 27 providers, and an overall deliverability score out of 10 broken into B2B, B2C and authentication sub-scores.
Pricing: $0.05 per mailbox per test, paid from wallet credits. Scheduled tests bill automatically, so keep enough credits available or tests will fail.
How to run one. Go to Addons > Inbox Placement > Start new test and work through four steps:
Select mailboxes and name the test. You can test up to 500 mailboxes in one run, filtering by provider or status, or selecting all active mailboxes. Failed and inactive mailboxes cannot be selected.
Choose providers and frequency. Test against Personal Gmail, Outlook.com, Google Workspace and Microsoft 365, picking one to four groups. Run the test one time, which is the most common choice, or weekly, biweekly or monthly.
Set message settings. Choose a sending interval between 1 and 30 minutes to mimic realistic sending, and optionally supply your own subject and body. InboxKit shows a recommended safe interval and an estimated completion time.
Review and confirm. Check the billing method, order summary and total, then click Start Test.
Your test appears under Test History as Processing, then becomes Completed with a View Results button.
For accurate results, use realistic sending intervals, keep the subject and body close to real campaign content, always test freshly created or newly warmed mailboxes, and re-test weekly. Pay attention to Missing results, because they usually point to reputation or infrastructure problems. Poor scores most often come from low warm-up levels, spam-triggering content, missing or outdated SPF, DKIM and DMARC records, or mailboxes hitting provider limits.
Email Validation
Email Validation cleans your lead lists before you send, removing invalid and risky addresses so you protect your bounce rate and sender reputation. You will find it under Addons > Email Validation, and it is also paid from wallet credits.
You're Live
Working through these topics leaves you with a funded account, active domains with DNS fully configured, live mailboxes, a connected sequencer, exported sending accounts, warm-up running and monitoring in place. That is a complete cold-email infrastructure.
More video tutorials: Team & Workspaces · API & MCP
Need help with anything here? Reach us at [email protected], or browse the Help Center for the detailed article on any individual topic.